verify site ownership on google webmaster tools

May be don’t need to tell why you need to verify and submit your site to google webmaster tools. Anyway we can start,

First go to Google Web Master tools if you are not logged in then log in with your Google ID. You will see a page link below screenshot


google-webmaster-tools

Click on “ADD A SITE” red button then enter site address, some simple process don’t need to tell actually. one time you will face a screen like below which will tell you to verify ownership of the domain/site.


webmaster-tools-namecheap-varify

I am using namecheap DNS service, this service is a great service really, I will show a alternate method at the end of this tutorial.

Copy the text of text box (5) and login to namecheap* then Domain >Manage Domain>Click on your domain you want to verify> All host record.

webmaster-tools-namecheap-varify-txt-record


Now we need add a txt record, add a ‘@’ sign in (1) text box, paste the text in text box (2) we copied before and select txt record on dropdrown (3). Now save it and back to google webmaster tools page. Click on verify button and it will be completed. To save TXT record it may take sometimes like 10 menutes (depends on namecheap service).

The process is almost same if you are using different provider. If you get complex then go to step 2 (after click on “Add a Site”) click on alternate method on google webmaster tools then you will see like below,

alternate-method-to-varify-ownership


Select HTML file upload radio button then download the file from this html verification file from and upload it to the root folder of your domain(it can be easily possible by FTP or cpanel file manager), the html file address should be yourdomain.com/htmlfile.html 

Now click on verify button and you will be done ;)

Also you will find more 2 easy alternate method like this.

How to make a simple child theme In wordpress

WordPress has a nice templating system. This is one good reason for it’s great publicity. Anyway we can start working now.

Why we need child theme?

Good question, suppose you have bought a wordpress theme/template and started a site, after some days you will get notification that the theme provider provided an update. You can’t update the theme because you have already applied modification on it. This is why child theme rocks. You can update your main theme anytime without breaking your modification.


How to make a child theme?

First of all, we need to declare a new theme. For example our theme name is “theonepager”. Now we need to make a new directory name “theonepager-child” (you can use any name actually) beside the main theme folder. You can do it from cpanel file manager.

Here is one screenshot of the main theme and child theme position,

child-theme-cpanel-file-manager


Now enter in the  child theme folder and make a new file from New File navigation button (at top left) and file name should be “style.css”. Select the file (style.css) and click on “code editor” (on nav), a dialog box will appear click on edit button.

See below which text should be added at the very top of the blank css file. Actually we are going to add some info in the stylesheet as comment and a css importing statement.

/*———————————————————–

Theme Name: theonepager child theme Template: theonepager Author: asifsaho Author URI: http://asifsaho.me Designed & Developed by asifsaho Theme URI: http://asifsaho.me License: GNU General Public License version 3.0 /* =================================== */

@import url(../theonepager/style.css);

Carefully add the main theme css file in the @import css tag.  Actually all info is not mandatory without the info are showing in the below screenshot.


child-theme-stylesheet


Yes we are almost done. now to to Wp Admin Panel and then you will see a new theme, name “theonepager-child” as below screenshot.


Now activate the Child theme and write your all modification CSS which will override the main theme CSS. Also you can copy any theme file from from main theme folder to the child theme folder if you want to customize it as your need.

The files will get most priority which you will put in the child theme folder. That’s it!

Cool! now update your the main theme anytime without any data loss ;)

Social Buttons with Transition CSS Sprite

CSS Sprites is actually for making less request to server. Think your site load with 30 small images when it open in a browser. For this small 30 images (png/jpg) your hosting server will receive 30 requests. Here css sprite rocks, we will put all images in a file and just add the file url in background css with background position. The background file can be like below,

This is a example of background file, tuteplus is using this background.

I have created a background image, this below

I have create the button with CSS Sprites and transition effect.

  • Just create a navigation with basic css
  • Set the background image for each navigation item
  • Now add an extra statement for positioning background

[css]background-position: 0 37px;[/css]

  • Make hover event for the nav items and when user hover on it then the background will be changed as hover item.
  • Now we will see that the background is changing while hovering on the social nav but it is changing at once not smoth as the preview!
  • Lets apply a transition css property to make it smooth. on hover and normal event add transition delay time like below.

[css] .social:hover { -webkit-transition: all 400ms ease-in-out; -moz-transition: all 400ms ease-in-out; -ms-transition: all 400ms ease-in-out; -o-transition: all 400ms ease-in-out; }

.social { -webkit-transition: all 400ms ease-in-out; -moz-transition: all 400ms ease-in-out; -ms-transition: all 400ms ease-in-out; -o-transition: all 400ms ease-in-out; } [/css]

  • Now you are done adjust the delay time while changing background of the social nav.

My Creation is below and it’s live,

[button link=”http://asifsaho.me-content/uploads/download/social-icon/socialbtn.zip” size=”large” color=”teal”]Download Source[/button]

Droplr Quick Image sharing program for all

As a freelancer I always seeking for good tools and now I have got a new tools for sharing files. We know about dropbox, skydrive, box and many other program but droplr is highlight for a good advantage. Not for file sharing it is very fast for image and screenshot sharing. If we compare this tools with dropbox then see how many step we need to share a screenshoot. Continue reading Droplr Quick Image sharing program for all

A File Renamer

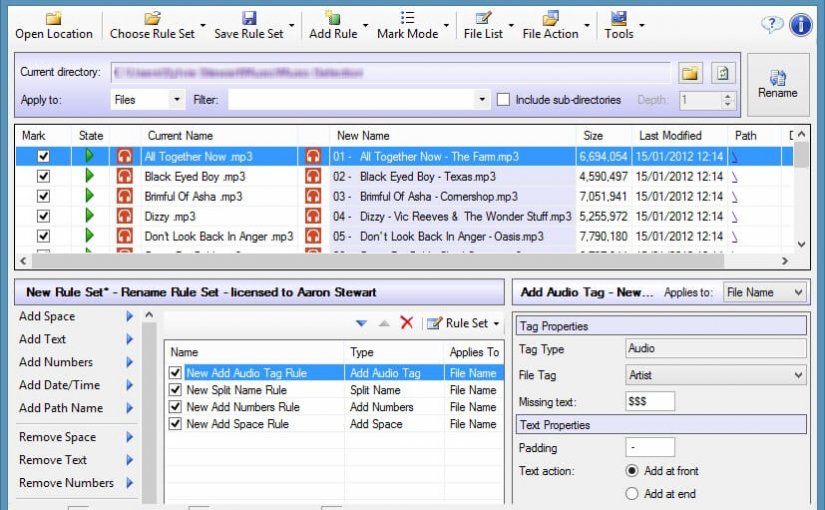
Batch File Rename is a great File Rename Utility. This is a product of ronsplace.me.uk, It is an easy to use files and folders renaming tool. It can replace characters, remove/add numbers, remove/add text, changing case, split names, and many more. The software provides an instant preview that allows you to check the renaming results without actually changing any of your files.

Continue reading A File Renamer